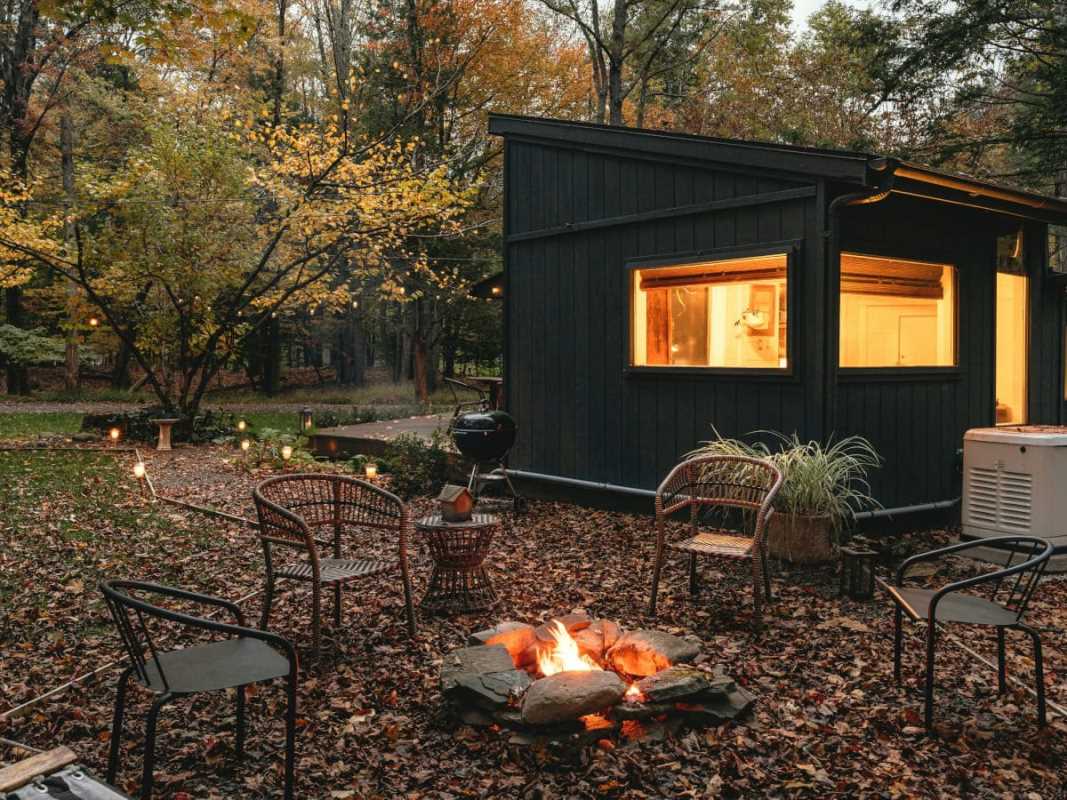
Gathering around a firepit is one of life’s simple pleasures. The crackle of the flames, the cozy warmth, and the glow that lights up stories and laughs turn any backyard into a social hub. But you don’t have to shell out big bucks for a premade firepit.
With some creativity and a few supplies, you can build a custom firepit that perfectly suits your outdoor vibe. Whether you want something rustic, modern, or just plain functional, we’ve got you covered. Here’s how to create your own backyard focal point without breaking the bank.
Choosing the Right Location and Design for Your Firepit
Before you start stacking stones or pouring concrete, the first step is picking the right spot for your firepit. Safety is key here, so choose an area that’s far enough from your house, fences, overhanging trees, or any flammable structures. Make sure it’s on flat, sturdy ground and away from high traffic zones to avoid accidents.
Think about the size and shape while planning your design. A circular firepit is the classic choice, but square or rectangular designs can be a nice modern touch. Your design could mirror your backyard’s aesthetic or stand out as a stylish centerpiece. Take time to decide whether you want an above-ground structure or one that sits flush with the ground.
Materials will also play a big role in your firepit’s look and function. Bricks, concrete pavers, cinder blocks, and stones are all budget-friendly. If you’re feeling crafty, you can even repurpose items like tractor tires or metal washing machine drums.
Another consideration is the firepit's use. Will it serve mainly for ambiance, or do you envision marshmallow roasting marathons and campfire cooking? If cooking’s part of the plan, choose materials that won’t crack under heat or emit harmful chemicals.
Make sure to check your local fire regulations before getting started. Some places require permits or have specific rules about firepits, particularly when it comes to size or placement.
Building a Brick Firepit from Scratch
Brick firepits are perfect if you’re aiming for something sturdy, durable, and timeless. The good news is they’re also straightforward to construct and won’t eat up too much of your budget. To get started, you’ll need bricks (fire-rated ones are best), a shovel, gravel, and a set of gloves to keep your hands safe.
Begin by outlining your firepit’s shape on the ground. You can use rope, spray paint, or even lay the bricks down temporarily to mark the area. Once you’ve marked the space, dig about six to eight inches into the soil to create a foundation. This provides stability and prevents shifting over time.
Fill the hole with gravel and pack it down tightly. The gravel helps with drainage, so rainwater doesn’t turn your firepit into a backyard pool. Now comes the fun part: laying the bricks. Place them one by one around the edge of your foundation, ensuring they’re evenly spaced and level.
You can dry-stack the bricks for a quick build or use mortar for a more permanent structure. If you go the mortar route, work in small sections, applying just enough to secure the layers without making a mess. Continue stacking until your firepit is two or three layers high.
Finally, add sand or lava rocks to the bottom of the pit. This creates a barrier between the fire and the ground while helping distribute heat evenly. Your brick firepit is now ready for starlit evenings and toasted s’mores.
Creating a Simple Stone Firepit
For a natural look that blends seamlessly with your landscaping, consider building a stone firepit. Stones come in various shapes and sizes, making it easy to customize the design to your liking. Plus, collecting stones from your property or a nearby source can make this option virtually cost-free.
Start by selecting stones that are dense and heat-resistant, such as granite or basalt. Avoid stones that retain moisture (like limestone), as they can crack or even explode when heated. If you’re sourcing stones yourself, be picky and choose ones that are uniform enough to stack but still have a rustic charm.
Clear the area you’ve chosen for your firepit, removing grass, weeds, or debris. Lay out your stones in the shape you want, tweaking the arrangement until you get a snug fit. When you’re happy with the layout, start stacking.
Like with bricks, you can use mortar for extra security, but a dry-stack stone firepit is equally effective and embraces an earthy vibe. Build the walls up to a height of about 12-18 inches. Try to interlock the stones as you stack for added stability.
Add a layer of gravel, sand, or lava rocks to the bottom of the firepit. This will protect the stones from getting too hot and extend the life of your creation. Now light it up and bask in the glow of something both cozy and handcrafted.
Upcycling Materials for a Unique Firepit
If you’re all about sustainability and creativity, building a firepit from repurposed materials is the way to go. Think outside the box and give new life to items headed for the landfill.
Metal barrels or drums are a popular choice because they’re sturdy and heat-resistant. To turn one into a firepit, start by cutting it down to your desired height using a saw or grinder. Smooth out any sharp edges to avoid accidental cuts. Drill some small holes along the bottom for airflow, which helps the fire burn efficiently.
Another upcycling idea involves using old concrete tree rings. These circular pieces are stackable and make for an effortless assembly. You can find them at garden centers or salvage yards if you don’t already have some lying around.
For a one-of-a-kind centerpiece, how about a firepit using old bricks or pavers from a demolished patio? Layer the materials following the same steps as traditional brick firepits, but revel in the charm of mismatched, weather-worn textures.
Here’s a list of upcycled materials you can use for firepits:
- Metal washing machine drums
- Tractor wheels or tires (just avoid rubber coatings)
- Cinder blocks or pallets of used bricks
- Enamel bathtubs or sinks for unique setups
Not only do these items give your firepit personality, but they also keep costs down while helping the planet.
Maintaining Your Firepit and Safety Tips
No matter how stylish or durable your DIY firepit is, maintenance is key to keeping it safe and functional for years to come. Regular cleaning goes a long way in preserving its look and ensuring your fires burn efficiently. Clear out ashes and debris after each use to prevent blockages and lingering odors.
If you used mortar in your construction, keep an eye out for cracks or loose areas. Fixing these early prevents larger issues down the line. For metal firepits, watch for rust and treat it promptly with rust-resistant paint.
Safety is just as important as aesthetics. Always keep a bucket of water or sand within arm’s reach of your firepit. Teach everyone using it about proper fire-extinguishing methods, just in case. Never leave a fire unattended, and always double-check that it’s completely out before heading inside.
Remember to maintain safe distances when seating guests around the firepit. Sparks can fly farther than you think, so arrange chairs at a comfortable but safe distance.
By taking these precautions and caring for your firepit, you’ll ensure it remains the centerpiece of countless outdoor hangouts, all while keeping everyone safe and happy.
Build a Space Worth Gathering Around
There’s something special about a DIY firepit. It’s more than just a functional addition to your backyard; it’s a conversation starter, a gathering spot, and a piece of your creativity brought to life. Whether you use bricks, stones, or upcycled treasures, the end result will be uniquely yours.
With a little effort, you’ll have an outdoor space that’s perfect for roasting marshmallows, sharing stories, or simply unwinding under the stars.